The online shopping market is growing rapidly these days and selecting one suitable E-commerce platform is a big issue. Squarespace is a preferable E-commerce platform where you have a small product to sell. There are certain limitations with the platform which makes you opt for a more suitable platform like Shopify. Squarespace is an excellent platform to build a website and the right choice for service-based businesses. If you are looking for an online shopping platform and E-commerce business, then Shopify is the best option.
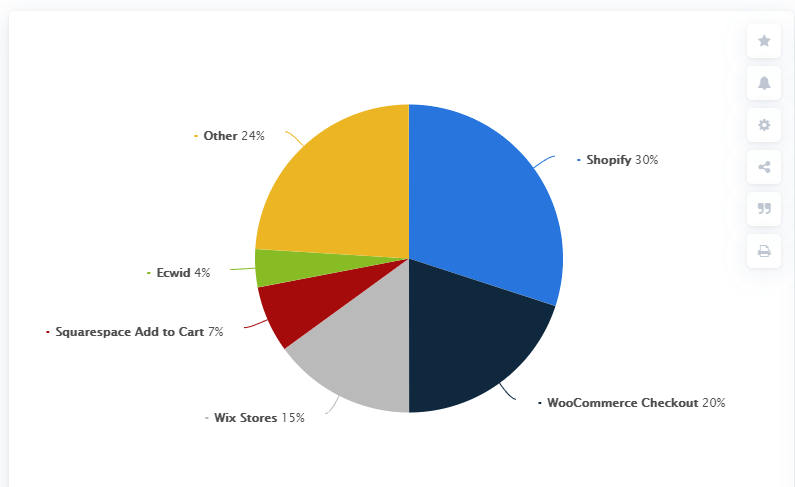
As per Statista, the market share of Shopify among all the E-commerce platforms in the United States is the highest i.e. 30%. If you are a merchant on Squarespace platform and need to switch to Shopify, migration is always an option. This blog covers all the important aspects regarding both the platforms and migration from Squarespace to Shopify.

Why Shopify is Preferred?
- Shopify is specifically built for E-commerce businesses whereas Squarespace is intended for general website building. Squarespace came up with E-commerce later on for the needs of users.
- Shopify encompasses a third-party app store with extended features and smart software. With these apps, changes can be made in the website design, sales can be enhanced and various issues can be resolved. Squarespace does have some required integrations but does not have a platform for third-party apps.
- Shopify comes with a liquid code that enables you to customize the store without any restrictions. Shopify theme store can be used for templates and a whole different website can be built. In the case of Squarespace, it is limited and restrictive to customize the front-end and back-end as it is majorly for non-technical people.
- Shopify has 100+ distinguished payment gateways with dynamic checkout buttons which enable PayPal and Google Pay directly from the product pages. Squarespace has only two payment gateways.
- Shopify also has its own SEO feature by which the ranking of the website can be improved.
Read how to make Shopify site SEO-friendly
Steps for Squarespace to Shopify Migration
1. Exporting Products from Squarespace: The first step is to export the data from Squarespace. Keep the Squarespace site live and perform the following steps –
- Click on Settings in the Home menu
- In the Advanced option click on Import/Export
- Select Export
- In the menu of Export Site, choose the products
- Click on Download and the products will get downloaded as products.csv file
2. Exporting Content: Next comes exporting the content from the website including blogs, text and images. Follow the steps mentioned below to complete this –
- Click on Settings in the Home menu
- In the Advanced option click on Import/Export
- Click on Export
- Click on the icon of WordPress (Even though you are not migrating to WordPress)
- A single blog page can only be exported, if there are various blog pages, a message will be displayed “Select Primary Blog”
- From the drop-down menu, go for the primary blog and click on the “Export” option
- Wait till the export process completes, it might take time depending on the content of the website
- Download the file which was exported
- After completing the download, save the .xml file by clicking on it
3. Register on Shopify and instigate the staging: The next step is to get registered on Shopify and initiate the staging site. This is where you can seek and try all new things for your website. You can also go for a 14-day trial which is free after checking the look and feel of the website. There are charges and fees after 14 days and the process of migration is going to take longer than 14 days. A Shopify expert can also be hired for complete access to the development store without an expiry date. After instigating the development store, check all the information and settings and set it up properly.
4. Import Products to Shopify: Since the two platforms we are talking about are direct competitors, it is not easy to import the .csv files into Shopify. You can do this in different ways, either by an automated service provided by the app store or manually by cataloging small products. You can also use the Excelify app to automate the process in case you have a lengthy product catalog or face any difficulty while importing.
5. Import Content to Shopify: For importing the XML file to Shopify, it is again recommended to use the Excelify app. You can complete the process effortlessly and can convert your XML file to a .CSV.
6. Choose a Theme: Once you have uploaded the content to a new site, choose a theme and preview the look and feel of the website. It is recommended to check the Turbo theme from the Shopify theme store, it may be a bit pricey but has a feature list that will be very useful later.
7. Change Domain Settings: This is the final step of the process which ensures the traffic is going to the brand-new store. Click Here to complete this step-by-step. Access to domain settings and hosting is needed while doing this. It might take a day or two for the domains to point out Shopify correctly. Also, keep your Squarespace store open till it is ensured that traffic is driven to the new site.
Final Words
All the businesses are unique and so are the platforms to build them. Thus, it is significant to choose an E-commerce platform that meets your business demands perfectly. Here was a user-friendly guide on migration from Squarespace to Shopify. You can also contact a professional Shopify development company to execute the process seamlessly.
About SynergyTop
Based on Shopify E-commerce platforms, we develop and deploy sophisticated online stores using both Shopify and Shopify Plus. Additionally, SynergyTop is adept at creating custom Shopify applications to accommodate the client’s needs. Connect with us today to learn more about our Shopify development, training and support services. Our experienced team is looking forward to support you through this migration. Write to us at contact@synergytop.com.
Also, read The Top 10 Shopify Plus Features That Boost Your Online Sale


